We’re all familiar with the X-rays used to take images of people’s bones and teeth at medical and dental facilities. But did you know this same technology can also be used to examine the internal structures of museum objects?
At the UCLA/Getty Conservation Program, a three-year master’s program with labs at the Getty Villa, we’ve been able to take X-radiographs of many of the objects we’ve treated in our studies thanks to antiquities conservator Jeff Maish, who’s been especially gracious in offering his time and expertise to the students.

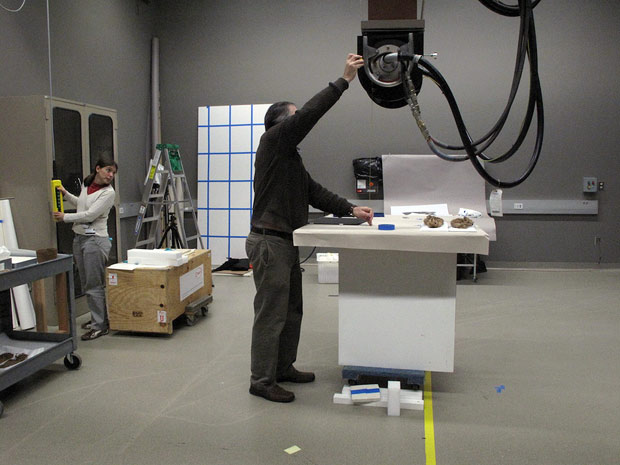
X-raying ethnographic objects at the Getty Villa. At center, conservator Jeff Maish measures the distance between the table and the machine; at left, student Tessa de Alarcon adjusts the equipment to the desired height

The X-ray tube is adjusted in order to image the objects from the side, rather than directly overhead.
X-rays can help us understand an object’s internal structure and original construction techniques. The students in our program have used X-rays to identify casting techniques in archaeological metals, clarify prior repairs on objects, see the extent of internal insect damage on wood pieces, identify pigment patterns covered by surface materials, and identify pieces within objects that could not be seen or accessed from the outside.
Recently, with Jeff’s help, the students imaged some pieces from the Agua Caliente Cultural Museum (2008.016.002). Here’s a behind-the-scenes look at how it was done.

Elizabeth Drolet and Tessa de Alarcon discuss film and object placement before imaging.
The baskets from the museum are made of plant fibers, which are not very dense. Such objects are particularly challenging to image. We placed them directly on the X-ray film to get the best results. (The degree of X-ray penetration of an object is controlled by the “kV,” or kilovoltage. Since plant fibers and other “light” materials are imaged at a low kV, placing them directly on the film means that the X-rays do not need to pass through an additional envelope, which could partially absorb the beam, thus providing the clearest image possible.)
This needs to be done in complete darkness, which can be a bit tricky! Luckily, Jeff recently acquired a red “safelight” flashlight so we can see as we move the objects onto the film.

Once we place objects on the film, everyone leaves the room (which is lead lined, partially underground, and designed to block scattered radiation) to stand outside for a minute or two while the film is exposed to the X-rays. After the exposure, the film is placed into a protective lightproof envelope for transport into the darkroom, where it is fed into a machine for processing. Later, the radiographs are digitally scanned at high resolution for further study on the computer.

Tessa patiently awaits her processed X-rays.
How do you “read” an X-ray of an object? The image has a pattern of lighter and darker tones according to the density of the material. X-rays that pass completely through an artifact, encountering no resistance, create a black image. The more dense a material is, the lighter it appears on the X-ray film.

Tessa and some of the other students examine the X-ray image of the sandals from the Agua Caliente Cultural Museum.

Details (digital) of the sandals Tessa worked on from the Agua Caliente Cultural Museum. Tessa post-processed the images in Adobe Photoshop, highlighting regions with different colors to emphasize particular construction elements.
The structure and composition of materials influence how much of the rays they absorb. Knowing this helps us identify prior repairs or different materials that might not be easily differentiated with the naked eye. The X-ray resolution can also be high enough to identify structural details of individual plant fibers.
So what did we learn from the X-rays? In the case of the sandals, we were able to see the interior cordage supporting the sandals and identify how it was made. The X-rays also allowed us to understand how the straps were attached to the bottom of the sandals, and how the sandals themselves were woven. All this information not only contributed to our understanding of how these types of objects were made, but also helped guide our conservation treatments.
As a new quarter begins, we will continue to look at the “bones” of artwork, turning our X-rays on archaeological ceramics and bronzes.
To read more on the topic of X-ray examination of sandals, see “The use of ‘soft’ X-ray radiography in determining hidden construction characteristics in fiber sandals” by D.T. Yoder in Journal of Archaeological Science 35 (2008), pp. 316–321.
Text of this post © Dawn Lohnas. All rights reserved.


To see additional work performed for this class, check out the exhibition “Western Science Seeks Cultural Knowledge,” described at
http://www.accmuseum.org/Online-Exhibitions and do please provide comments or questions.
Baskets are important not only amongst the Cahuilla, but for Native peoples throughout the west and northwest regions of the United States. It seems fitting, then, to focus the eyes of conservators on baskets and other items made from plant materials in the collections of the Agua Caliente Cultural Museum. This exhibition demonstrates the kinds of discoveries that UCLA graduate conservation students made in the investigation and treatment of cultural objects and sandals in the Museum collection.