
In the establishing shot for the video “Drawing with Charcoal: Historical Techniques of 19th-Century France”—filmed on the grounds of the Getty Center—artist Timothy Mayhew prepares to begin a landscape drawing.
The newest exhibition at the Getty Museum, Noir: The Romance of Black in 19th-Century French Drawings and Prints, explores artists’ use of light and shadow to evoke mood and create depth in drawings and printed works of art. In the late 19th century, artists had a growing trove of tools to help them depict light and shadow both subtly and dramatically: sticks of charcoal, brushes, paper and leather stumps, and cotton cloths.
Cinematographers also use tools to shape light and darkness in film and video. As part of Noir, the Getty’s Collection Information and Access Department produced the video Drawing with Charcoal: Historical Techniques of 19th-Century France, which features contemporary artist Timothy Mayhew using charcoal and other tools to demonstrate step by step the techniques used for creating a landscape drawing. As the video’s cinematographer, it was my task to not only record the methods Timothy demonstrated, but also to create a visually poetic presentation.
There is a saying in the motion picture industry, “Keep it simple, stupid,” or KISS, for short. Working with a small crew—myself, the director, and the writer (all of us department staff), the production was all about efficiency. The following technical and creative choices allowed for the message and the beauty of this narrative story to come out through subtlety and realism.
Pre-Production Preparation
Thanks to pre-production storyboarding—the process of sketching out each scene on paper—we already knew what shots we wanted to capture before we headed to the outdoor location at the Getty Center. By having everything planned out ahead of time, storyboarding helps to avoid a “fix it in post” mentality. The storyboards gave me ideas for how to visually capture each segment of action and aided me in planning the appropriate equipment to bring. On set, they are a great reference tool for accomplishing an ambitious shooting schedule.
The Production Phase
Even in the best situation, simple doesn’t always mean small or lightweight when it comes to equipment.
Shooting outdoors, we had to be prepared for a variety of natural lighting situations, which meant hauling tools of the lighting trade to the location: solid “flags” and diaphanous “silks” that can be set up to control harsh light, and artificial light fixtures that illuminate darkness and create contrasting highlights. If you have ever read the closing credits on a film or television show, you may have seen the titles of gaffer and grip. The gaffer, sometimes called the lighting designer, is the chief electrician who supervises the lighting according to the cinematographer’s visual design for a shoot. The grip works with the gaffer to set flags and silks to cut or control light and create shadow effects. On our small crew, I wore all three hats, so it was in my best interest to keep it lean!
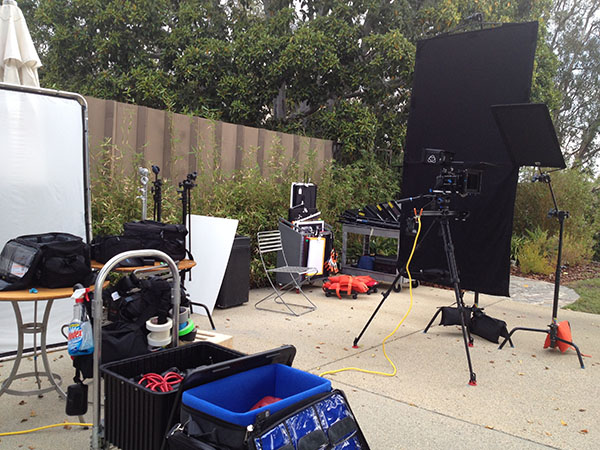
Flags, silks, lights, and the camera stand ready in the equipment staging area.
We were shooting on a partly cloudy day, which creates lighting situations that vary and shift. This meant that at times the naturally existing, diffused light was perfect for filming, while at other times—when the sun broke through the clouds—it was necessary to fly a silk over the action to soften the light. When the sun went behind a thick cloud, I used artificial light to create highlights that mimicked natural sunlight. For these shots, I used Balcar lights, which are fluorescent, daylight balanced lights with a soft quality that imitated the hazy sunlight. My goals in using these pieces of equipment were always to control the light so that it was consistent from shot to shot, and to create a lighting effect that was natural-looking and believable.

Cinematographer Stacey Rain Strickler captures Timothy as he draws a landscape. Visible on the ground is the shadow of an overhead silk, used here to soften the sunlight.
Tech-wise, I shot the video on a Panasonic GH4 camera outfitted with Rokinon lenses, recording onto an Atomos Shogun monitor in 4K ProRes 422 format. A Libec ALX S8 slider was utilized to introduce motion in some scenes. When shooting, I like to get as close to the finished visual product in-camera, capturing slow motion effects, zooms, or color enhancements during filming. This limits as much as possible the amount of post-production manipulation needed.

With the sun behind a cloud, an artificial light positioned near Timothy creates natural-looking highlights for the camera. At left, the silk stands by after being used to diffuse light when the sun was out.
Since the main objective of this video was to be an educational demonstration, I wasn’t as heavy-handed with optical filtration as I would have been if we were creating an actual noir-style film with deep shadows and heavy contrast. (Optical filters alter the light entering the lens and affect contrast, color, sharpness, and create special effects.) I did use some filtration to enhance the look of the video by polarizing the sky to tease out the blue bits from the haze and dropped Neutral Density gradation filters from the top of the frame to knock down the brightness of the sky for a hint of drama. (The Neutral Density or ‘ND’ filters affect exposure only by absorbing light evenly throughout the visible spectrum, which doesn’t shift color. Part clear and part neutral density, with a smooth gradation between the two, they allowed me to darken just the sky without affecting the rest of the image.)
By using the polarizer, which requires two stops of exposure compensation, I was able to open the aperture to around an f/4.0. This allowed me to soften the background and emphasize the foreground elements and the action by working within a short range of focus.
See It For Yourself
Once filming was completed, the final product came together in the editing room with the addition of sound and voiceover narration, along with graphic elements and still photos.
Although I knew from the storyboarding process how the video would look once it was edited, there is always a period of anticipation while waiting to actually see the images pieced together in a narrative live-action sequence. I can’t help but analyze each scene, frame by frame, to judge the effects of my creative choices and weigh how or if I would film things differently.
As is typical of most projects, there are adjustments I would make in this video—but if I told you what they are, that would only draw attention to them. And since the goal is never to draw attention to the photography, but to allow the photography to enhance the story being told, I will leave it to you to enjoy the real star of this video—the story.


“…sticks of charcoal, brushes, paper and leather stumps, …”
Stacey, I’m assuming an overactive spell-checker but don’t you mean “stomp?”
Beautiful and expressive video. A great example of the value derived from traditional cinematographic techniques. Congratulations.