
In a 1948 letter to Philadelphia Museum of Art curator Henry Clifford, artist Henri Matisse expressed his concern that the apparent “facility and negligence in the drawing” in his work confused many young artists into thinking they could forego a rigorous study of the principles of picture making. “This slow and painful process,” he goes on to say, “is indispensable for the education of contemporary artists…” I believe this is true, as well. Furthermore, I do not believe there is an appropriate age at which this course of study should begin. If we mean to develop individuals who not only appreciate, but comprehend the means and ends of art, clarity in all of its dimensions is essential.
Knowing is better than guessing!
 One of the least appreciated but most essential aspects of art is the study of perspective and its application to picture-making. In this exercise, participants can learn to make and use PLAN and ELEVATION grids as tools for organizing picture elements.
Making a drawing is not unlike building a house.
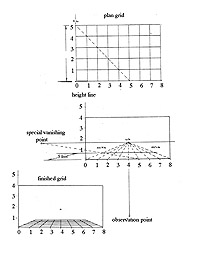
Step 1: Plan Grid
On an 11 x 17-inch piece of paper, make a scaled grid using 3/4-inch squares. Leave a 1-inch border all the way around. In this grid, 3/4 of an inch equals 1 foot.
This grid will be used to plot, or plan, the location of elements within the picture plane by marking off the area they occupy. I use tracing paper overlays for preliminary work; that way the grid can be used over and over.
Step 2: Elevation Grid
On a larger piece of paper or poster board, perhaps 14 x 17 inches, draw a horizontal line all the way across and 4 inches from the bottom. This is called the ground line.
Draw a vertical line 2 inches from the left edge of the paper from the horizontal ground line to the top of the page.
Divide this vertical line, and the horizontal ground line into 3/4-inch units, beginning at the point where the two lines meet. This is the zero point. Number each point, 0 through 15, etc. These are measuring lines for length and height.
On the elevation grid, draw a horizontal line at the number 5, or at the 5-foot height. This is the horizon line. Find the center of the horizon line—this is the center vanishing point. From this point, draw a line down to the bottom of the page. Divide the portion below the ground line into five 3/4-inch sections. The fifth point down is called the observation point. Measure the distance from the center of the horizon line to the observation point, then place a point on the horizon line to the left of center, the same distance away from the center line. This is the special vanishing point used to establish distance. Find a point on the ground line to the right of the center line. Draw a line from that point to the special vanishing point.
Now draw a line from the zero point on the left to the center vanishing point on the horizon line. The point where this line intersects the line to the special vanishing point marks the distance in space (the depth) that corresponds to the distance from the center line to the point on the ground line connected to the special vanishing point. Now connect all points on the ground line to the center vanishing point on the horizon. Where each of these lines intersects the line to the special vanishing point, draw a horizontal line all the way across. This produces a perspective grid with a vertical scale for measuring height.
Step 3: Draw an Object
Select any single object—a book, a vase, etc. Measure its height, width, and length. Transfer these dimensions to the plan grid using the ratio of one foot to each 3/4-inch square, and using the measurements on the grid to draw an accurate representation of the object.
Transfer the object from the plan grid to the elevation grid and place the drawings at the desired heights. Every object you add will be in a perfect three-dimensional relationship to the other elements in the picture.
Artist Biography
 Photo (detail) courtesy of the artist and Jack Shainman Gallery, New York
Currently lives in Chicago, Illinois
Kerry James Marshall’s kindergarten teacher inspired this MacArthur “genius” fellow to become an artist. His teacher’s scrapbook of photographs and greeting cards brought tears to the young Marshall’s eyes, giving him first-hand experience of the power of art. Marshall continues to find inspiration in the artworks of others, including paintings by the old masters, drawings by Charles White, and Marvel comics.
As a child, Marshall witnessed civil rights protests in Alabama. When his family moved to South Central Los Angeles, he was raised near the Black Panthers headquarters. Galvanized by his upbringing and by the lack of black people in the paintings of Rembrandt and Michelangelo, Marshall seeks to make visible that which is invisible. In his Souvenir painting series, he commemorates civil rights leaders in compositions that evoke Renaissance paintings of the annunciation. In Rythm Mastr, he reanimates heroes represented in African sculpture by rendering them as comic book superheroes. In all of his works, Marshall engages with art historical practices and motifs while re-positioning black figures within U.S. cultural history.
 David Walker, Kerry James Marshall. Courtesy of the artist and Jack Shainman Gallery, New York.
 Power to People Pinup, Kerry James Marshall. Courtesy of the artist and Jack Shainman Gallery, New York.