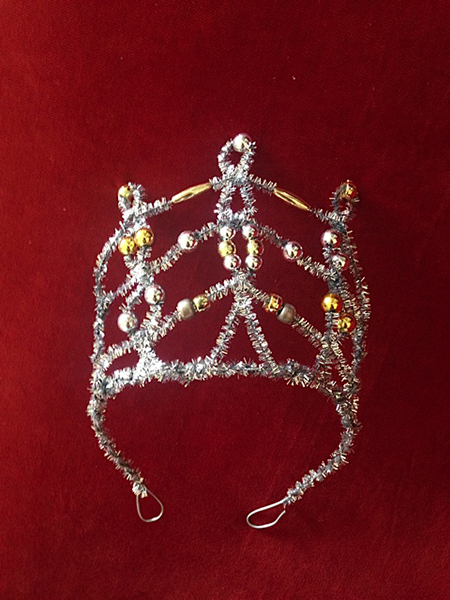
The artist reveals her tiara-making secrets in advance of a free Family Festival on April 12
Twice a year the Getty Center turns into open-air family playground for Family Festivals, which offer an all-day mix of music, stories, and hands-on art projects. The free event on Saturday, April 12 pays tribute to Queen Victoria with an English music hall sing-along, kid-friendly Gilbert & Sullivan, a photo booth, itinerant bagpipes, and three art-making workshops. It’s all free, no reservations required; just drop by.
On the day, artist Marianne Sadowski is leading a special craft that’s a perfect match for the royal theme: make your own tiara or crown. We asked her to share her recipe for the perfect queenly tiara, which uses easy-to-find, inexpensive materials and requires only a little clever twisting.
Materials
- Wire
- Beads
- Pipe cleaners
Steps
1. Form the tiara base
Form the tiara’s structure by bending a wire (show here at center). Twist the ends to make two loops, as shown.
2. Bling the base
Wrap the wire you just bent with a pipe cleaner. Here Marianne has used silver pipe cleaners for royal flair, but any color will work. It just depends what color of monarch you want to be.
3. Create the tiara’s front
Take three pipe cleaners of your choice; fold each in half, add plastic beads of your choice, then twist once or twice, adding more beads as you go. Leave the ends open. (You can use any beads, but plastic ones are lightweight and won’t cause your tiara to collapse under the weight of its own sparkly jewels.)
4. Attach the front to the base
Now attach these three pipe cleaner twists onto the tiara base and add two (or more) horizontal stems to provide structure, adding more beads in between.

5. Finish and wear
Twist the open ends on the left and right sides together and, presto!, your tiara is ready to wear to your next coronation, royal wedding, or job interview.
Photos courtesy of Marianne Sadowski


![Peter Plagens Answers Your Questions [VIDEO]](https://d3vjn2zm46gms2.cloudfront.net/blogs/2012/05/27011748/peter_plagens-387x264.jpg)
Comments on this post are now closed.