Do you want to post on this blog? Here’s how.
Art & Language Arts Online—Instructions for Blog Authors
Log in to this blog. Scroll down to bottom right corner and click on “log in” using your username and password. You’ll see the “Dashboard” open up on-screen. The Dashboard is the interface that allows you to author and edit posts.
If you don’t have a username for this account, e-mail teacherblog@getty.edu and tell us your name and what username you would like to appear on your posts. We’ll set up your account and send you a password.
Change Your Password
1. On left side of screen, click on “Profile”
2. Scroll down to bottom of page where you can type in a new password.
Getting to Know Your Dashboard
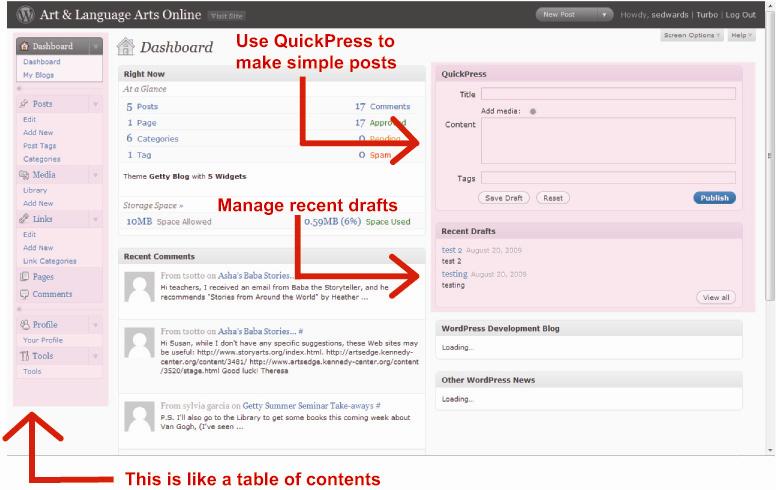
1. Boxes on the left side of the screen, under the word “Dashboard” with the house icon: This is the table of contents for the Dashboard.
2. Two wide columns in the middle of the page: These are shortcuts to areas within the dashboard. You can customize these, move them around, collapse them, and add and delete them. Don’t worry, you’re only changing what you see, not what other blog authors see.
3. The two boxes on upper right—QuickPress and Recent Drafts—will be most useful to authors.
Create a New Post
There is more than one way to post:
1. “QuickPress”—use this tool in the upper right-hand corner of the Dashboard. Enter a title for your post, the body of your post goes in the Content field, and then type in some keywords to tag your post.
- Click “Publish” button to post your entry live.
- To review before you post, click “Save Draft.” You’ll see an option at top of QuickPress window to “Preview Post” or “Edit Post.”
- After previewing, use the back button on your browser to go back to the Dashboard. Refresh your browser and you’ll see your draft appear in the box titled Recent Drafts. Click on your draft title to go to the editing screen where you can edit, or publish your post.
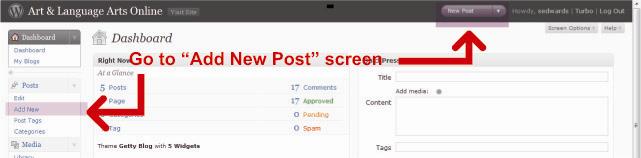
2. “Add New Post” window—you can get to this window from 3 places:
- If you are logged in, from the blog’s homepage, you can click on “Add Post” on the bottom right corner of the blog.
- In the Dashboard, use the New Post menu on upper right band of screen.
- In the Dashboard, go to the Posts menu on left side of screen. Choose “Add New” from the menu.
Within the window “Add New Post,” you have the option to add many features to your post. Below is an explanation of the most common fields you will use. Required fields are starred *
- * Title – Enter a title for your post in the open field at the top of the page, just below the thumbtack icon.
- * Body – Enter your post in the large white box below the title field. You can format your text using the buttons at the top of the box. For example, to bold text, select it with your mouse, and press the “B” button. Click the last button on the right “Show/Hide Kitchen Sink” to see more formatting options.
- If you are familiar with HTML code, there is a tab in the upper right you can choose to view the HTML for your post. It is not necessary to use this tab.
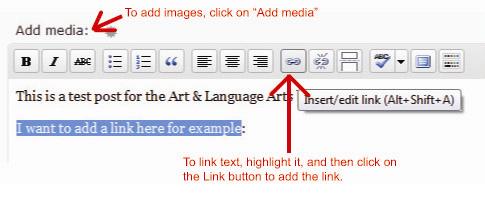
- To add hyperlinks: select the text you want to link and click the link button. A pop-up window will appear. Enter the Link URL in the first field. You can ignore the other fields.
- To add images: Click on “Add Media *” above the formatting buttons. You’ll get a pop-up window with instructions for uploading an image, or grabbing an image from another web site.
- * Post Tags – Insert any keyword tags for your post in the field, separated by commas.
- * Categories – Please tick the box next to one or more categories that you feel your post fits.
- * Publish – Click the blue Publish button to post your entry to the blog. To save a draft, click Save Draft. You can leave the blog and come back later to finish your draft. Just click on Recent Drafts in the Dashboard, or Edit under the Posts menu on the left to get to your draft.
- Excerpt – Not required. If the blog posts are truncated in the future (they are not now), this field would indicate the excerpt to post.
- Send Trackbacks – Not required. You can enter links to blogs you’ve linked to in this post. This happens automatically for many blogs. This is not recommended.
- Custom Fields – Not required. The administrator uses this to add options to the blog.
- Discussion – Please do not un-tick these boxes.
Recent Comments