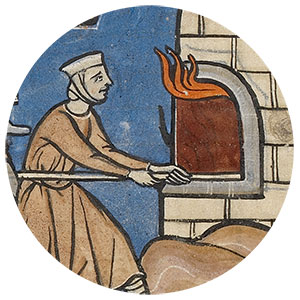
Baking Bread (detail) in a psalter by an unknown illuminator, Belgium, mid-1200s. Tempera colors, gold leaf, and ink on parchment, each leaf 9 1/4 x 6 1/2 in. The J. Paul Getty Museum, Ms. 14, fol. 8v
An illuminated manuscript in the Getty’s collection features this illustration of bread baking from the 13th century. For the food historian, it presents a number of quandaries.
 One figure works the dough with his bare arms in a large trough set on a trestle table, which is clear enough. The other maneuvers a long-handled peel, presumably setting the bread into the oven or removing it.
The illuminator had no doubt seen this procedure, but the details are somewhat confusing. On the floor beneath the oven there appears to be a flowing mound of dough of the same type as in the trough, though no one in their right mind would put dough on the ground. It must be a figurative depiction of the rocks or dirt beneath the oven.
More perplexing is the shape of the oven, which is extremely tall and narrow—a shape completely inefficient for baking bread, since the heat would rise to the top and the surface of the oven floor would be relatively cool. It would be too small to hold more than a few loaves. Bread ovens are generally more wide at the base than tall, more spherical and domelike.
An oven aperture is normally two-thirds the height of the entire oven. This allows for the maximum flow of heat, aiding heat retention. This oven door does seem about two-thirds the height, but again, the oven is much too tall to work properly. Moreover, the flames licking out at the top of the door reflect an early stage of heating, but not the point when the bread would be baking inside. Normally after the hot coals have heated the oven for a few hours, they are raked out and baking begins.

A pizza oven, with which you might be familiar, is a little different as a fire is often kept burning at the rear of the oven to keep the temperature up and pizza bakes very quickly, unlike the slower heat of a bread oven. It is of course possible that it is an early kind of pizza or focaccia being baked—without tomatoes, of course, since those didn’t enter European cooking for centuries—but there’s nothing indicating that specifically here.
In all likelihood, the artist took some aesthetic liberties with the shape of the oven for dramatic effect or maybe just to fit the illustration neatly into the space on the page. In any case, reconstructing this procedure is largely a matter of guesswork. The earliest recipes for bread appear a few centuries after this illustration was drawn. In England we don’t get a decent description until Gervase Markham’s writings in the 17th century.
In a manuscript owned by Sir Hugh Plat we get this terse description, which includes barme—or beer yeast—rather than a sour leaven:
Take 3 quart of a pound of fine searced flowr: 2 spoonefulls of new barme worke this together wth hotte licore and cover yt close and let it stand and rest one houre & yt wilbe risen enough, then worke yt & breake yt well make small loaves & sett into the hotte oven the space of halfe an hour or lesse.
Searcing means finely sifted and bolted flour.
How to Make Medieval Bread
To make something close to medieval bread requires completely rethinking the way bread would be made, from beginning to end. I happened to conduct this extended experiment a few years ago as part of a larger research project. At first I used a natural sourdough leaven, along with commercial flour and a modern oven. It was good bread, but there was hardly anything medieval about it.
Commercial flour is a modern, hard high-protein wheat, milled in a completely different way than stone-ground wheat. A gas oven is also entirely different, with a steady even heat. A baking stone with some moisture added into the oven approaches the effect of a wood fired oven, but otherwise reveals very little about the physical experience of baking bread in the middle ages.
So here is the experiment from beginning to end.
1. Grow Your Own Wheat.
I started by growing a European low-protein wheat with a long historical pedigree. I gathered the seed by hand on a farm in Finland. I then planted the wheat in my backyard in wooden barrels. Predictably there was some rye among it, and what appeared to be a few stalks of oats. No matter, that was probably fairly typical in the past.

European low-protein wheat from seed harvested in Finland.
The wheat grew extremely well in the winter in California and I harvested at best twice the amount of wheat I had planted. Apparently I am not a great farmer, but I was nonetheless able to cut the wheat, thresh, and winnow it in a large basket by hand, more or less as would have been done in the Middle Ages.
2. Grind It by Hand.
Next came the stone grinding, which was done with a small hand quern. It took about half an hour of milling. A medieval miller would have been much more experienced than I am in “keeping his nose to the grindstone” to prevent heating the grain too much and in separating the hull, but I was able with a few grindings and siftings to get a reasonably fine whole grained flour, a little over a pound or 5 cups.

Grinding the wheat.
To this was added about a cup of natural starter made only with flour and spring water, fed every day with more flour and spring water for about two weeks until the yeast and bacteria were nicely balanced and it smelled pungent. I had been using it for a month or so to make sure it was strong enough before using on the backyard flour. The starter, flour, more water and a little salt were kneaded into two loaves and each left to rise for about 3 hours, then kneaded again and placed into a wicker basket forms, covered with a cloth and left to rise about 18 hours until nearly tripled in size.
3. Cook It In Your Hand-Built Oven.
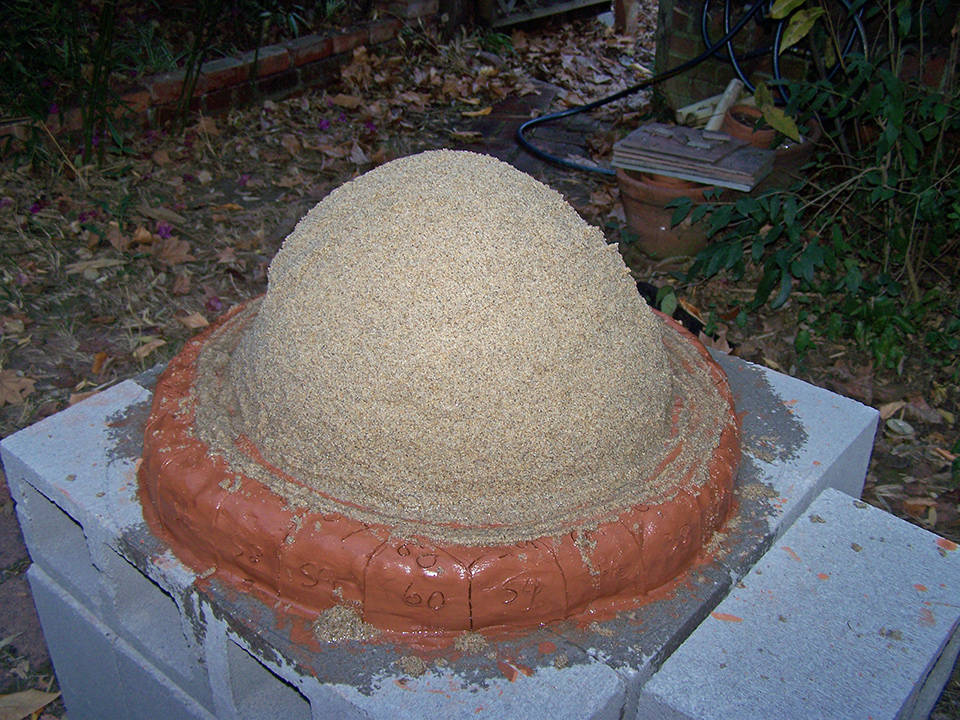
Now turn back the clock about a month, when I built the wood-firing oven. I did not follow plans and was determined not to spend a lot of money either. Essentially I laid out cinder blocks on top of which I patted a slab of clay about a foot thick. On top of that I laid a refractory clay shelf, which can withstand direct flame. Then a hemispherical dome of wet sand. On top of that I laid another foot of clay all around. After letting it harden for a few days I scooped out the sand.

The hand-built backyard oven takes shape.

A slab of clay and a dome of wet sand atop the oven.
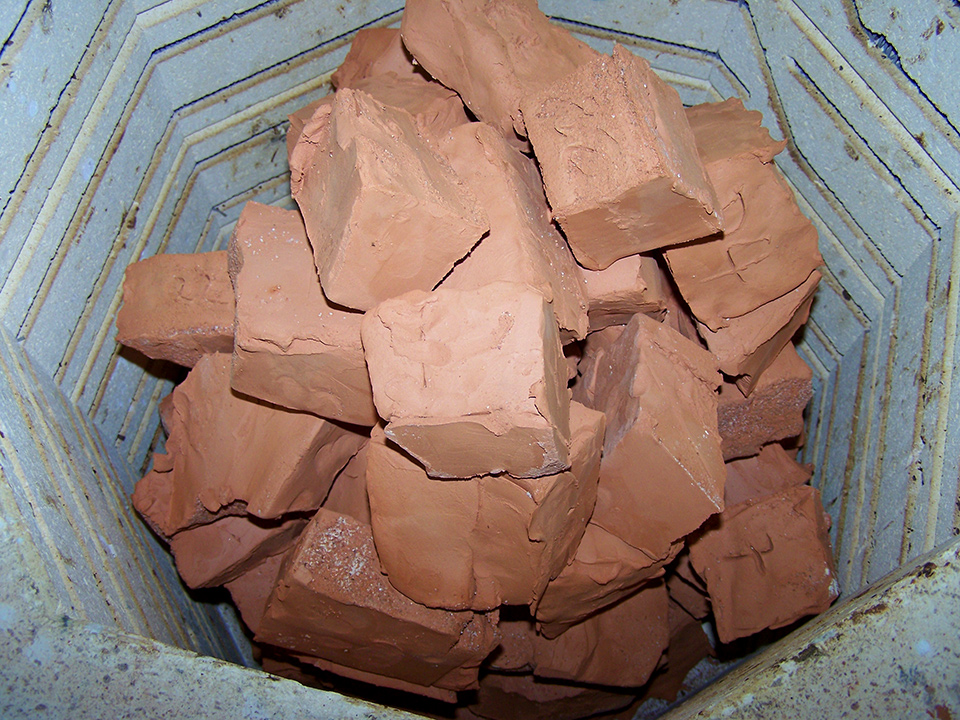
In retrospect, I should have let it dry completely and fired it in situ, but I decided to cut the entire thing into bricks, all carefully labeled and then fired them in a kiln. Little did I realize how hard the reassembly would be when the bricks were labeled with uppercase, lowercase, and Greek letters!

Carefully labeled clay bricks.

The clay bricks within the kiln.
I was able to get everything back together with mortar and then cover everything with a foot’s thickness of stucco. Fiberglass insulation would have made it much more efficient at heat retention, as would straw in the bricks, which would have been more historically accurate as well. In any case, the oven worked fine, easily reaching about 500 degrees, which is excellent for baking. Smaller sticks work better than heavy logs for some reason.

The oven hard at work.
With about an hour or two of burn, the oven was extremely hot inside and could still be touched on the outside, meaning that it did hold the heat fairly well. Once it got hot enough I dragged the ashes out with a shovel and cleaned the floor of the oven with a wet mop.
The loaves were turned out onto the peel, quickly slashed with a very sharp knife in a star pattern allowing the dough to rise upward, and finally slid into the oven. The door was closed and the loaves baked until they sounded hollow when rapped.
The result you can see in the final image below. Whether this bears any resemblance to a medieval loaf is beside the point; I was able to experience more or less what the medieval baker would have done every day, on a larger scale. And incidentally, the bread was fabulous.

The final, delicious product.
_______
#ArtofFood is a series about food in art in medieval, Renaissance, and early modern Europe. It complements the exhibitions The Edible Monument: The Art of Food for Festivals at the Getty Research Institute and Eat, Drink, and Be Merry: Food in the Middle Ages and Renaissance at the J. Paul Getty Museum. Visit the Getty Center to explore both exhibitions via the Art of Food mobile tour.


I was at the Getty last week to see Marcia Reed’s wonderful Edible Monument exhibition and saw the manuscript exhibition as well. The bread-baking scene really puzzled me: thank you for decoding it!
Ah! I can’t wait to see it. I love this museum, and am so glad they’re looking at food now! Ken
In the last picture of the oven, the one where it’s in action, is that a chimney in the back? Thanks!
Hi Joe, Yes it is. I don’t think I needed it, but it does serve to suck the air through with a nice draft. I think that may make the fuel burn quicker and certainly makes it cool down quicker at the end of firing. I think I must have been in love with the look of the chimney (which is wheel thrown) more than anything. And actually, I’ve hung meat over it to hot smoke during firing. Many bread ovens I’ve seen have a chimney in front or not at all. So this was basically my “winging it” as usual.
We have built a stone oven (concrete, stone, brick, fibreglass insulation) and after using it for one season with the chimney at back, re-built it so chimney is at front as in so many illustrations. The chimney at back allows heat to leave oven before circulating properly to warm entire oven evenly, re-building it in the more traditional way has improved performance greatly. (A chimney is an improvement over the smoke just exiting out front, as it will, in the baker’s eyes!) Examination of the traditional cob oven at the Ukrainian Village west of Edmonton, Alberta, was helpful and, yes, small sticks work better than large ones, at the Ukrainian Village, they use dried willow sticks.
Just a note to add to the discussion on ovens…Wandering about Sinaloa Mexico a few years ago, stopped at a little restaurant, store, house, east of Culiacan,( not a recommended tourist destination). Next to it was a Mexican DIY oven. Searching my memory here– Built up stone platform maybe 30–36 inch high, large bees hive shaped oven, about 3 — 4 feet in diameter, plastered smooth, large oven door, and ,I think , a couple smoke holes at the top. Wasn’t being used just then, but someone was preparing sardine cans for bread pans, so it was probably in regular use. Possibly fired with mesquite or brush, but charcoal is in use in the area. Possibly checking around those villages would provide lots of information about basic ovens and baking.
The varnish and fish oil residue on the cans possibly providing a “traditional” Tang to the bread or pan.
Always wanted to try to duplicate that oven, but it would be awkward on the apartment balcony…..
Ken – interesting post, for all sorts of reasons. I’d love to see a slightly fuller account of how you built the oven. Does the refractory clay shelf end up right on the cinderblock at shown, and then the wet clay of the base piled over it, or..? And that doesn’t quite look like a foot of stucco? Etc. I’d love to emulate this one day, anyhow.
thanks Andrew, see below.
There’s a complete account in my book The Lost Arts of Hearth and Home. And yes, the refractory clay kiln shelf is the floor of the oven, it can withstand pretty much anything. And yes, the stucco on the outside is really thick. A foot is a guess though.
“The earliest recipes for bread appear a few centuries after this illustration was drawn. In England we don’t get a decent description until Gervase Markham’s writings in the 17th century”
While this is essentially true, in France enough scattered information exists to assemble into some pretty suggestive data on how bread was made- which is what I’ve done in a blog post:
http://leslefts.blogspot.com/2015/09/french-bread-history-making.html
I’m not really a baker and living in a one-bedroom rather hampers any plans of growing wheat or building an oven (both of which are course excellent ideas when doable). But I’ve been able to make some bread with a credible claim to being called medieval, using what guidelines I could extract here. Really though I’m hoping this information will be of more use to some REAL bakers.
The one big point I would emphasize is the importance of bolting and sieving – preferably with textiles. This is all the more true in that much medieval bread was made in three qualities: white, brown-white and brown (or, as they would have been considered in the time, fine, middling and poor). I’ve rarely seen this emphasized in any discussion of recreating period bread, but it had great importance at the time. And you can’t imagine just what “white” really meant until you’ve hand-sifted home-ground flour down to its whitest state (which, for me, still yielded a pretty dark bread).
Otherwise, I’m still obsessed by those brown shapes at lower right. I doubt they’re meant to be dough (it’s not like it was hard to see bread being made in the period), but what they are is beyond me. Maybe the raked out ashes from burning wood in the oven? No, they’re not gray, but that is what one was most likely to find at the base of an old oven. Or perhaps simply earth, used as a kind of buffer from the hot base? None of these is a really satisfactory guess, but then what is?
Hey Jim, You are absolutely right about bolting. It was something I really didn’t think enough about since bolting cloths seemed impossible to find and regular cloth didn’t work at all. I think William Rubel has tracked some down and has been doing it successfully, but that was after I did these experiments. Ken
This is where being a member of a community like SCA can help. I actually found some measurements for later bolting cloths of different finenesses. If one’s circle of acquaintances includes people with an interest in medieval textiles, one of them might actually enjoy creating bolting cloths to the earlier specs. (And if one wants to make a more English medieval bread, a recreationist brewer could provide the foam from the ale to use for yeast.)
A reminder how much infrastructure goes into recreating the very simplest aspects of the past.
One document I cite mentions having a hatter bolt the flour, which was probably not uncommon. But of course there wasn’t just bolting. There were sieves – the Gauls used horsehair, some medieval folks apparently used the bristles (“silk”) from pigs. And some were made with punched leather.
For my own purposes, I tried a few methods, including mesh and cheesecloth, but also a cheap straw hat with just enough of an open weave to work. The big glitch for me was that I used my blender to grind the grain, which probably mixed the bran a little too finely with the endosperm. I’m thinking of investing in a hand mill, but your stone quern certainly looks tempting as well.
Someone on Youtube demonstrates bolting, but unfortunately says nothing about where she gets her cloth.
One thing’s for sure – this part of the process will show one just how labor intensive making bread was, and why being sent to work in a bakery was sometimes a punishment in both Rome and South America. Whatever its monetary cost, in terms of human sweat. bread was never cheap.
In the North of England you could (can) buy Barm Cakes which were small round loaves about the size of a an English teacake. I haven’t eaten one in many, many years as I don’t live there any more but they tasted a little different from ordinary bread baked at a real bakery and were quite delicious.
They’re often served with chips! A chip barm is a very tasty thing, although maybe not all that medieval
I’m intrigued by your quern – it’s obviously of modern manufacture, but it appears to do what my “two rocks and a stick” quern does as well and faster than my ancient model. May I ask where you acquired it? My ungodly heavy stone quern is wonderful for public displays (kids love to try their hand at producing their “daily grind!”), but I’d really like one like yours for when I’m working in my own kitchen!
Lori, I bought it online. It’s made in France is all I remember, but I’m sure with a little searching you’ll be able to find the same model or one like it. It was pretty inexpensive too, as I recall. Ken
Smaller sticks are what is used for several reasons. One is that they burn quickly, so you get good quick bursts of heat, rather than waiting for 5 hours for it to heat up. You don’t need to heat all the thickness of the oven, just the outer layer of the inside.
Then with a quick, hot burn you’ll get good consumption of the wood and less ash. Also you can dry thin sticks more easily and quicker than logs; what you want for the job is nice dry sticks, not resinous, that can give off complex hydrocarbons which can condense in unhelpful places or taint the food.
That’s an interesting approach to making the oven as well. How did you come to think of it?
Period ones that I have examined were usually made from tiles stacked edge on, or lumps of rock made to fit together in the appropriate shape.
Finally, here’s the blog of a re-enactor I know who has been running their small oven at events for 2 or 3 years now, baking rolls and pasties with great success:
https://bakedinfire.wordpress.com/
You can also see something about medieval baking in the documentary that was made showing people at Guedelon in France a few years ago, try searching for “Secrets of the Castle – Ruth, Peter and Tom at Guédelon”
It seems likely that the dough on the ground was proving, near to the warmth of the oven. Modern ovens often have a proving drawer for bread to rise underneath the oven.
Wow! You went to great length to resemble the ‘medieval way’ of baking. Have you tried to bake with barme yet?
Thanks for an interesting article. Agree with Carol, below, in 2017- think that the brown stuff on the ground is indeed dough, there to rise in the warmth from the oven. Could it have been, say, a tiled floor?
In terms of food hygiene, while it might not meet 21st C standards, since the dough is subsequently baked at high temperature, it’s unlikely to cause any problems even if bacteria are picked up off the floor.
Hello,
I came across your article while looking for information about ancient Mesopotamian bread baking, and read about your perplexity concerning the oven depicted in the miniature. Then I found another illustration that looked surprisingly similar, except that it represented a Biblical pottery kiln. You can look it up under http://www.biblearcheology.org – the article is called ‘The Master Potter’. If the medieval miniature represents potters instead of bakers, it would explain the pile of stuff on the ground…
Regards,
Julia Palffy
The actual link for the article is here:
http://www.biblearchaeology.org/post/2011/07/05/The-Master-Potter-Pottery-Making-in-the-Bible.aspx
But I don’t see any oven resembling the one above.
curious on how it tastes ?
This looks fantastic! I’m so impressed that you’ve worked through all these stages to be as authentic as possible and to produce a delicious looking mediaeval loaf ! It must have been hard work. Very helpful too, as I am researching mediaeval food and cooking for a historical novel. You’ve inspired me to try growing ancient wheat and bake a mediaeval loaf myself!
Congratulations and thank you!
Nice read – Thank you.
The first illustration, “Baking Bread (detail) in a psalter by an unknown illuminator, Belgium, mid-1200s.”
Beside the oven: Not dough on the floor. As you say that would be daft. More likely a representation of sacks of flour. Far too large to be handled, but of a size to tell the reader that a large amount of baking takes place.